Showing posts with label pork. Show all posts

Wednesday, November 14, 2012

The Daring Cooks November 2012: Brining


Audax of Audax Artifax was our November 2012 Daring Cooks’ host. Audax has brought us into the world of brining and roasting, where we brined meat and vegetables and roasted them afterwards for a delicious meal!

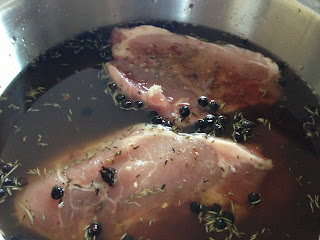
I have brined chicken before, so I knew that this was going to be a delicious challenge but I wanted to do something a little different. I did a little research and decided to do a maple-brined pork chop. Anytime anything is titled "maple" anything, I'm in. Especially in November when you're just starting to realize that those 60 degree days aren't coming back for a long while. To me, maple just says comfort like sitting cuddled up in a blanket in front of the fireplace.

The added bonus of this recipe is that the brining solution called for Juniper berries. My dad (who is the king of unique ingredients) bought me some Juniper Berries to use and I just haven't had a chance to use them until now. If you're lucky enough to have a Penzey's (yes again...) they do have them there. Juniper berries can be used to flavor any type of game or something as simple as pork.

The roasted portion of our meal was a recipe that accompanied the maple brined pork chop recipe that I knew we had to have. The words "Roasted Pear Chutney" should just make your mouth water. The pears smelled unbelievable while they roasted in the oven, and the combination of that sweet, caramelized flavor with the vinaigrette is pretty cool.

Now I've done a lot of talking up of this recipe. On paper, I think it looks to die for. In execution, I'm not so sure. The pork came out just ultra salty and I was not a big fan of the chutney. Dave loved the chutney and was so-so on the pork. Perhaps my measurements were a bit off or something, but it doesn't mean the end of brining for us.

Maple-Brined Pork Chops (slightly adapted from Epicurious)

Brine
1 cup kosher salt
3/4 cup sugar
1 cup maple syrup
2 teaspoons hot red pepper flakes
2 tablespoons juniper berries
1/2 teaspoon whole cloves
1/4 cup fresh rosemary, chopped
2 tablespoons chopped fresh thyme
12 garlic cloves, smashed
2 tablespoons chopped fresh ginger


8 cups water
4 center-cut loin pork chops, 1 1/2 inches thick
Freshly ground black pepper


1. Mix all of the brine ingredients together in a nonreactive pot and bring to a boil. Turn off the heat and stir the brine to ensure that the salt, sugar, and maple syrup have dissolved. Let the brine cool, then put it in a large nonreactive container and add the pork chops. Cover and refrigerate for no more than 12 hours.


2. Remove the pork from the brine and pat dry (without rinsing). Season with pepper (no salt- they've already been brined!)

3. Heat 2 tbs of olive oil in a large skillet over medium high-heat. Sear the chops, about 2 minutes on each side. Watch carefully, as soon as they are browned flip them. Lower the heat and cover the pan. Allow to cook for a few more minutes on each side, until the chops register at least 145 on your meat thermometer. Remove from pan and allow to sit a few minutes before serving.

Roasted Pear Chutney (Epicurious)

2 ripe Bosc pears, peeled and cut in half
2 tablespoons freshly squeezed lemon juice
1/4 cup plus 1 tablespoon sugar
3/4 teaspoon ground cinnamon
1/4 teaspoon ground cloves
2 tablespoons vegetable oil
1/4 cup pure maple syrup
1 small red onion, cut into 1/2-inch slices
1 garlic clove, chopped
1 teaspoon grated fresh ginger
3 tablespoons golden raisins
1/2 cup white wine vinegar
1 teaspoon hot red pepper flakes
1 teaspoon chopped fresh thyme


1. Preheat the oven to 350°F.
2. Toss the pears with the lemon juice, 1 tablespoon of the sugar, the cinnamon, and cloves. Coat a sheet pan with half the vegetable oil. Set the pears cut side down on the pan. Brush the pears with the remaining oil. Roast until caramelized and tender, 40 to 50 minutes, depending on the degree of ripeness. Remove from the oven and allow to cool.
3. While the pears are roasting, bring the remaining ingredients to a boil in a nonreactive saucepan. Reduce the heat and simmer for 5 minutes. Remove from the heat and allow to cool.
4. Using a small spoon or a melon baller, scoop out the cores of the cooked pears. Cut the pears into 1/2-inch slices.
5. Combine the pears and the onion mixture. Cover and refrigerate for at least 1 day before serving.





Thursday, June 14, 2012

The Daring Cooks June 2012: Cannelloni!

Manu from Manu's Menu was our Daring Cooks lovely June hostess and has challenged us to make traditional Italian cannelloni from scratch! We were taught how to make the pasta, filling, and sauces shared with us from her own and her family's treasured recipes!

You'll have to excuse the paper plate. I already packed the dishes.
My husband and I are now home owners!! We are so excited and slightly nervous about the reality of not having a landlord anymore. At the moment you are reading this, I am probably knee deep in boxes, trying to figure out where everything goes in our new house. I actually waited until sort of the last minute to make this month's challenge (that has been happening a lot lately...) because I was hoping to have this be the inaugural meal made in my new kitchen. Unfortunately that didn't happen. Instead, I held off packing anything in the kitchen until the day before the move so I could do this challenge as the last glorious send off of the old kitchen.


When I read about this month's challenge I texted my husband immediately and told him about it. He is (as I have mentioned before) Italian and his family has their own tried and true recipes for delicious sauce and Italian dishes. I was excited to try making pasta from scratch, even though I knew that without a pasta maker I was in for a lot of rolling pin work.

Fast forward to this past Sunday. The school year finished on Friday, we had just found out that we would in fact be closing on the house on the 12th, and oh yeah, we are leaving for our honeymoon trip to Napa, Sonoma, and San Francisco on the 17th. I had just finished packing up about 50% of what needs to be packed, moved lots of heavy boxes and now I'm rolling out egg noodles. Stress levels in our house were high, but the smell of sautéing onions, and homemade tomato sauce helps with that. So does wine :)

I'll just say one more thing: homemade pasta is worth it. Yes it is slightly time consuming, but not too bad. My mom always told me that a pasta maker is just an appliance that takes up room in your cabinet, but I am beginning to think that I need one. Until then, I'll continue rolling it out by hand.

Fresh Egg Pasta
What you need to know about egg pasta is that it is simple. All you need: a proportional amount of egg to flour, one egg to every 100 grams of flour.

Ingredients (to make 4 servings of cannelloni)
100 grams (⅔ cup plus 2 teaspoons) all purpose flour
1 large egg

Directions (for rolling by hand)
1. Put the flour and egg into a food processor and mix. When the dough looks like crumbs, pour it onto a countertop sprinkled with flour. Knead well by hand until you obtain a smooth dough. Make it into a ball, wrap it in plastic wrap and let it rest for 10-15 minutes.

2. Cut out a piece of egg pasta dough and flatten it into a rectangular shape with your hands. Roll dough flat and thin, about 1mm thick. Cut into rectangular sheets for cannelloni (4"x6").

Béchamel Sauce
Ingredients (enough for the 4 serving Cannelloni dish)
2 cups milk, hot
3½ tablespoons butter
⅓ cup all-purpose flour
1 pinch salt
1 pinch nutmeg

Directions
1. Put the butter in a non-stick pot and let it melt. Add the flour and whisk constantly until well incorporated: this is the "roux". Let it cook for a minute or two.

2. Now start adding hot milk little by little, while mixing continuously until the milk is well incorporated. Do not add more milk unless it is well incorporated. Keep doing so until all the milk is incorporated.

3. Add salt and nutmeg and cook on a low flame for 10 minutes or until it thickens.

4. When ready, cover it to prevent a film to appear on the surface.

Cannelloni di carne


Meat filling ingredients
1 lb ground beef
1 lb ground pork
1 onion, chopped
3 tablespoons extra virgin olive oil
1 bay leaf
5 tablespoons white wine
1½ cups Parmigiano Reggiano, finely grated
¾ cups of the béchamel sauce
salt and pepper to taste

Tomato sauce
1 small onion, chopped
2 tablespoons extra virgin olive oil
2¾ cups tomato purée
a few basil leaves
salt and pepper to taste

To assemble
The remaining béchamel sauce
½ cup Parmigiano Reggiano, finely grated

Directions:
1. Start by cooking the meat for the filling. Put the 3 tablespoons of extra virgin olive oil in a pan with the chopped onion and sauté until soft and translucent. Now add the meat and bay leaf and stir well with a wooden spoon making sure you remove all the lumps. Brown the meat well. Add the white wine and raise the fire to burn off the alcohol. Cook for 10 minutes on medium heat and then keep it aside to cool down. (At this point, I actually drained the meat even though it wasn't in the recipe.)

2. Now prepare the tomato sauce. Place the 2 tablespoons of olive oil in a pot with the chopped onion and sauté until soft and translucent. Now add the tomato purée, salt, pepper and basil. Cover and cook on low for 20 minutes. Then keep it aside to cool down.

3. To make the filling, mix the cooked meat with ¾ cup of béchamel sauce and 1½ cups of Parmigiano Reggiano. Adjust salt and pepper to taste.

4. Put a large pot with salty water on the stove and bring to a boil. I used a large shallow pan to make the noodles more manageable. Cook the pasta sheets in the water for 1 minute. Do in batches and place on a clean tea towel to cool.

5. Now take one sheet of cooked pasta and put 1/8 of the filling along the long side of the rectangle. Roll it over to make a cannellone. Do so for the remaining rectangles of pasta.

6. Take a big enough dish to fit all our cannelloni tightly. Spray it with some cooking oil (or melted butter) and pour some tomato sauce on the bottom. Spread it well, especially in the corners. Put the cannelloni in the oven dish on 1 layer.

7. Cover the cannelloni with the remaining tomato sauce and 1¼ cup béchamel sauce and sprinkle with the remaining ½ cup Parmigiano Reggiano.

8. Bake in a pre-heated 350℉ oven for 20 minutes. Then broil them at 400℉ for another 5 minutes. Serve immediately.

Wednesday, March 14, 2012

The Daring Cooks, March 2012: Braising

The March, 2012 Daring Cooks’ Challenge was hosted by Carol, a/k/a Poisonive – and she challenged us all to learn the art of Braising! Carol focused on Michael Ruhlman’s technique and shared with us some of his expertise from his book “Ruhlman’s Twenty”.


Man, I was excited when I saw that this month's challenge was such a basic technique. That I hadn't yet tried, not really, because, well it takes time, you know? But, like making croissants, the time is one of those false fronted, seemingly imposing buildings. If you see it from the right angle, you see that it is just a big distraction from the truth: braising gives you a delicious, tender meat (if you're using meat) and you don't have to stand over the stove for the entire time. Totally worth it!


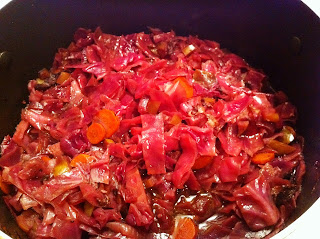
All the recipes that were provided for us looked truly delicious. But we had some pork chops in the freezer, so I turned to the ever trustworthy Julia Child. I found a recipe for pork chops and red cabbage braised in red wine that looked pretty promising. I wasn't so sure about the cabbage- I hate to say I haven't had a lot of experience with cooking, eating or even choosing cabbage. I figured, hey, there's red wine in here, I'll try cabbage for that. The resulting dish was truly delicious, although we only had 4 pork chops, so the ratio of pork to cabbage was a little off. It was yummy, but a little too much cabbage for me.


Side note- when this challenge was announced, I told my husband "see I need one of those Le Creuset dutch ovens." Proof he is the best husband ever: "okay, so go buy one." We didn't. But sometime it is just knowing that he supports everything you do that is important. I think the fact that he gets to eat everything I make for these challenges helps a little :)


Pork Chops and Red Cabbage braised in Red Wine (Julia Child)
  • 1 package boneless pork chops (1/2" thick - about 5 chops)
  • 1 Tbsp. Olive Oil
  • Salt & pepper
  • 1/4 lb. bacon
  • 1/2 cup thinly sliced carrots
  • 1 cup slice onion
  • 3 Tbsp. butter
  • 2 lbs (6 or 7 cups) red cabbage, cut into 1/2" slices
  • 2 cups diced tart apples
  • 2 cloves mashed garlic
  • 1/4 tsp ground bay leaf
  • 1/8 tsp clove
  • 1/8 tsp nutmeg
  • 1/2 tsp salt
  • 1/8 tsp pepper
  • 2 cups good, young red wine (Bordeaux, Chianti)
  • 2 cups beef stock
  • Salt & pepper to taste

Preheat oven to 325 degrees and tie on the apron - It's time to cook with Julia!

Remove the rind (if you get a chunk of bacon) and cut into strips 1 1/2" long & 1/4" across. Simmer for 10 minutes in 1 quart of water. Drain.

Cook the bacon, carrots and onion in the butter slowly in an oven-proof pan for 10 minutes without browning. Stir in the cabbage leaves and when well covered with the butter and vegetables, cook slowly for 10 minutes. Add all additional ingredients. Bring to a simmer on top of the stove. Cover and place in middle of preheated oven. Regulate heat so cabbage bubbles slowly for 3 to 3 1/2 hours. 


Season the pork chops with salt and pepper and brown in 1 Tbsp. olive oil. Add to cabbage, cover and return pan to oven for 1 to 1 1/2 hours more and all the liquid has been absorbed by the cabbage. Taste carefully for seasoning. 

Can be made ahead - this is even better when reheated the next day! Serves 6 people.

Sunday, July 18, 2010

Grilling!


Ages ago, before our landlord decided to tear up the back yard to build a garage (tearing up was done two months ago and there is yet to be any progress on the actual building...), the fiancé and I had visions of summer grilling and get togethers with friends. It was going to work out perfectly, the fiancé has a birthday at the end of June and he was going to get a real grill. Well, we had to give up that little dream as we watched the once perfect for summer get togethers backyard turn into a mud and gravel heap.

Not ones to be discouraged, my parents found this neat little Coleman traveling grill that has more cooking space than a table-top grill and a reasonable number of BTU's. To be honest, I don't know what BTU's mean, but my dad says this one is pretty good. We've taken it to a park nearby a couple times, but always with brats. This time, I wanted to do something a little more adventurous.

We made pork kebabs with a cucumber tzatziki. I had to do a little research to find out that a tzatziki is a traditional Greek/Turkish appetizer or dip. It was a really simple recipe, and the kebabs were good, but the tzatziki totally stole the show. Definitely a recipe worth repeating.

Grilled Pork Kebabs with Cucumber Tzatziki
4 burrito-size tortillas, halved
1/4 cup extra-virgin olive oil.
salt and pepper
1 lb pork loin, cut into 1 1/2 inch pieces
2 onions, cut lengthwise into 8 wedges each
1 tsp dried oregano
1 clove garlic, finely chopped
1 c plain greek-style yogurt
1/2 cucumber, grated

1. Preheat the grill to medium-high. Brush the tortillas with 1 1/2 tbs olive oil and sprinkle with salt. Toast on grill until browned, about 5 minutes.

2. In a large bowl, toss the pork and onions with 1 1/2 tbs olive oil and season with the oregano, salt and pepper.- I did this about an hour before hand since we were traveling, I don't know if the extra marinating time helped, but it can't hurt!- Thread onto 4 skewers.

3. Meanwhile, on a cutting board, using the flat side of a knife, mash the garlic and 1/2 tsp salt into a paste. Transfer to a small bowl and whisk in the yogurt, remaining 1 tbs olive oil and 1/4 tsp pepper. Press the cucumber in a sieve to remove excess liquid, then stir the cucumber into the yogurt mixture.

4. Grill the skewers, turning occasionally, until lightly charred and cooked through, 8 to 10 minutes. Serve with the tzatziki and tortillas.