Showing posts with label baking. Show all posts

Saturday, May 14, 2011

Snickerdoodles

Or the blog post in which I finally use the KitchenAid, profess my undying love for it, and make some pretty darn good cookies in the process.

You know how some guys are about taking a million different photos of their "tricked out" cars? And you look at those photos and think "what the heck, it's just a car, it doesn't look any different at this angle, or that one, or that one...."

I totally had a moment today where I had to tell myself to stop taking photos of the KitchenAid and focus on the food. Hence the paucity of prep photos with this recipe. It really is ridiculous.

Now that I'm working again, I have really missed my kitchen time. I'm missing my cuddle time with the fiance too, to be entirely honest. I can just hear him now "I can't believe you wrote that in your blog!" (he is far too shy about any sort of public acknowledgement of our coupleness- I have no idea how he is going to react at the wedding when we will be forced to kiss. multiple times. in front of an audience.) And again, after that parenthetical statement I can hear him... echoing his earlier statement. Poor guy.

For whatever reason, my second job has decided in the last few weeks that they really love me, and I've been closing at the store at least two nights a week (after a full day in the classroom), and working at the store all weekend. Kitchen time has been close to nil. I think the most cooking I've done is browning some beef for tacos. Cuddle time has faired a little better, but not much.

Somehow, I managed to get tomorrow off work. Which is a darn good thing, because we have a family gathering for one of Dave's cousin's first communion. Dave's aunt asked me to bring cookies to the party and I jumped at the chance. Making food for other people is probably my favorite thing in the world, after cuddling. (Yes, I'm being ridiculous on purpose. Again, I have to say, Poor Dave) The interesting aspect of this food assignment is that two of the young children in the family cannot have food dyes. So the awesome looking Monster Cookies my darling matron of honor made were out. Then I had two genius thoughts: Snickerdoodles! Some variation on classic chocolate chip cookies- look for that recipe to follow soon! So the cinnamon-sweet adventure in the kitchen for this weekend began.

Snickerdoodles (from the ever awe-inspiring SmittenKitchen)

2 ¾ cups all-purpose flour
2 teaspoons cream of tartar
1 teaspoon baking soda
¼ teaspoon salt
2 sticks unsalted butter (room temperature)
1 ¾ cups sugar
2 tablespoons ground cinnamon
2 large eggs

1. Sift together four, cream of tartar, baking soda and salt; set aside. In a mixing bowl (or in the bowl of your KitchenAid, yay!) combine butter and 1 ½ cups sugar. Beat on medium speed until light and fluffy- about 2 minutes. Scrape down the sides of the bowl. Add eggs and beat to combine.  Add dry ingredients and beat to combine. Chill dough to desired scooping consistency (about an hour worked for me).
My favorite thing in the kitchen!

2. Preheat oven to 400 ° F with one rack in the top third and one rack in the bottom thrd of the oven. Line baking sheets with parchment or silicone baking mats.

3. In a small bowl, combine ¼ cup of sugar and the ground cinnamon. Use a medium cookie scoop to form balls of dough and roll in cinnamon sugar. Place about 2 inches apart on baking sheets.

4. Bake until the cookies are set in the center and begin to crack, about 10 minutes, rotating the sheets halfway through. *the cookies will NOT brown. So seriously, just about 10 minutes. Or you'll burn the bottoms of the cookies. Not that I did that with the first set in the oven or anything*

5. Transfer sheets to a wire rack to cool, about 5 minutes, before transferring cookies to the rack to finish cooling.

6. Eat these bad boys. It seems silly that something so simple is so good. But there it is.

Saturday, April 23, 2011

Pop-tarts

On one of our new (salad size) plates, thanks Aunt Vicki!

Pop-tarts are one of those things that I used to eat as a kid that, for whatever reason, my mother didn't let my younger brothers eat because they "aren't good for you". I am not about to argue with that statement, I stopped eating them myself after reading the nutritional info on a package once. I suspect she didn't let them eat poptarts because they always chose the chocolatey- s'more flavored ones, or anything that didn't even hint at fruit fillings. When I saw a recipe for homemade pop-tarts I got really excited, these have to be at least healthier due to the lack of preservatives and the fact that I get to choose what gets put inside, right? 

Making these was fairly easy, it is a nice cool day (read: rainy and chilly, ugh April in Wisconsin) so the dough was really easy to work with. The biggest issue I had was moving the tarts from the counter, where I had rolled them out, filled and topped them, to the baking sheet. If you push down on those edges hard, you end up sticking the tart to the counter even more. I was also a little surprised at the small size of these. I am not a pro at cutting things perfectly evenly, so I had some that came out fairly regularly sized, and some that were tiny. But none of them were comparable in size to the pop-tarts you buy in the store. Not a problem, just not what I was expecting. 

This was also one of my biggest forays into the kitchen since I've started working full (and then some) time again. It was good to start with something so simple and easy, I didn't have to re-check the recipe a million times, and once I got started it was nice to just let my instincts take over. Additionally, I got to break out a bunch of new cooking tools. Dave's mom threw me a bridal shower last weekend and we got so many nice things! It was nice to use a substantial mixing bowl (rather than the plastic ones I've been using up to now.) We are also loving our new dishes! We are so lucky to have such wonderful and loving people in our lives.

Homemade Pop-tarts (from King Arthur Flour/Smitten Kitchen)

Ingredients (pastry)
2 cups all-purpose flour
1 tablespoon sugar
1 teaspoon salt
1 cup (2 sticks) unsalted butter, cut into pats
1 large egg
2 tablespoons milk
1 additional large egg (to brush on pastry)

Fillings: you can use anything for a filling, we did the cinnamon-sugar filling

Cinnamon Sugar Filling
1/2 cup brown sugar
1 1/2 teaspoons cinnamon (or less if you wish)
4 teaspoons all-purpose flour

Jam filling 
3/4 cup jam
1 tablespoon cornstarch mixed with tablespoon cold water

Other good ideas (that my mother most definitely would NOT APPROVE of) include Nutella and chocolate chips

Using my new mixing bowls. Thanks Aunt Lisa!
1. Whisk together the flour, sugar and salt. Work in the butter with your fingers, pastry blender or food processor until pea-sized lumps of butter are still visible and the mixture holds together when you squeeze it.
2. Whisk the first egg and milk together and stir them into the dough, mixing until everything is cohesive, kneading briefly if needed.


3. Divide the dough in half, shape into a smooth rectangle, about 3/5 inches. If you'd like to wait to finish the recipe, these dough rectangles can be wrapped in plastic and refrigerated for 2 days.

4. Place one piece of the dough onto a lightly floured workspace and roll it into a rectangle about 1/8 inch thick, large enough that you can trim it to an even 9x12. Repeat with the second piece of dough. Set trimmings aside.

5. Cut each piece of dough into thirds horizontally and vertically (forming 9 rectangles).
6. Beat the additional egg and brush it over the surface of the first dough. Place a heaping tablespoon of filling into the center of each rectangle, keeping the edges clear (so you can seal them). Place a second rectangle over the first, pressing firmly along the edge of the rectangle. Repeat with the rest of the dough/filling. Press the tines of a fork along the edges of the rectangles. 

You can't tell, but these are on my brand new HUGE baking sheet, again, thanks go to Aunt Lisa!
7. Place the tarts on a parchment lined baking sheet. Prick the top of each pop-tart with a fork or toothpick so steam can escape while baking. 

8. Refrigerate the baking pan of tarts for 30 minutes while the oven is preheating to 350 F. 

9. Bake the pop tarts for 20 to 25 minutes, until they're a light golden brown. Cool in pan on rack. Store in an airtight container for up to a week.

 Remember those trimmings you saved? You can sprinkle those with some more of the cinnamon-sugar filling and bake them for 13-15 minutes and have a nice little bite sized snack!

Saturday, April 2, 2011

Carrot Cake Cupcakes

After teaching all week (I know, I know, everyone else in the world with a full time job is sick of hearing me complain about ACTUALLY working) I was exhausted. Too exhausted to document my cooking experience with these delicious carrot cake cupcakes.

I was a little anxious about having planned to make these for a benefit we are going to on Saturday, mostly because when I decided to make them I thought I was going to have plenty of time to play in the kitchen on Friday. Thank goodness the recipe was so ridiculously simple that I kept having to re-read it to make sure I wasn't missing anything.

My only issue with the recipe was that my carrots must have had a lot of moisture, because the cooking time listed in the original recipe didn't turn out to be enough. The first dozen, which I was planning on keeping at home anyway, turned out a little soggy at first and one cup that I overfilled didn't really cook all the way through even after additional time in the oven. The second dozen turned out fine after a few more uninterrupted minutes in the oven.

I snuck tastes of enough of the frosting and batter before washing the bowls that I haven't eaten one yet, but Dave had one and said it was delicious. That's always a good sign.

For the actual recipe, you'll have to go over to Smitten Kitchen and check out her beautiful rendition of these cupcakes. Pretend mine look like that too. Because I totally did all that piping rather than just spread the frosting on with a knife. Yeah.

Friday, February 25, 2011

Mocha-Almond Cake for two

The baking urge hit today, and it hit hard. Unfortunately, it is time to go grocery shopping so there isn't a whole lot around the house to bake with. We have two eggs, but we also like to do eggs for breakfasts in the mornings on weekends so I was faced with a dilemma. After doing some searching online, I found a few recipes for chocolate cake that didn't use any eggs and did some combinations and made some changes. My first attempt baking a cake without eggs, and I'm pretty pleased with the result.


This was also a fun experiment with the 6 inch cake pan. We don't need a whole 9-inch two layer cake for two people, so I cut down the recipe by half and made a 6 inch two layer cake. The only difficulty with this was the baking time. It was just a matter of setting the timer for smaller intervals and checking the cake often. 
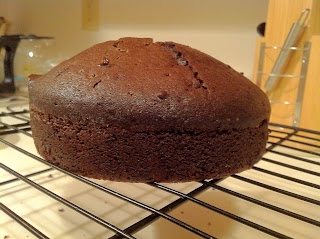
Lop-sided cake... this is the reason for my cake-guillotine.

No-egg Chocolate Cake

  • 2-1/4 cups sifted all-purpose flour
  • 1-1/2 cups white sugar
  • 1/2 cup unsweetened cocoa powder
  • 1/2 cup vegetable oil
  • 1-1/2 cups water
  • 1-1/2 teaspoons baking soda
  • 1/4 teaspoon salt
  • 1 tablespoon and 1-1/2 teaspoons vanilla extract
  • 1/3 cup mini chocolate chips

1. Preheat oven to 350, grease and flour a 6 inch round pan.
2. In a large bowl, sift together flour, cocoa powder, soda and salt. Add sugar and mix together.
3. Add oil, water and vanilla and mix thoroughly.
4. Pour into pan. Bake for 40 minutes or until toothpick inserted in center comes out clean.


Mocha- Almond Frosting
1 1/2 cups powdered sugar
1/3 cup unsweetened cocoa
1 1/2 tablespoons hot brewed coffee
1/2 teaspoon vanilla extract
1/4 teaspoon almond extract
1/4 cup butter, softened
2 tablespoons half & half

1. Whisk together sugar and cocoa in a bowl. Combine coffee, vanilla and almond extract in another bowl. 
2. Beat butter at medium speed until creamy; gradually add sugar mixture alternately with coffee mixture, beating at low speed until blended. Beat in half and half, 1 tablespoon at a time until smooth and mixture has reached desired consistency.


*A word about the frosting: DELICIOUS. It is so creamy and light. If you don't have or want to use the almond extract, use a full teaspoon of vanilla extract in the frosting instead.*


Assembling the cake:
1. When cake layers are completely cool, place bottom layer on serving plate. Trim tops of both layers to create flat, even pieces. Spread a layer of frosting on top of the cake. Top with second layer of cake and frost top and sides. 
2. Sprinkle with toasted slivered almonds. 


Sunday, February 13, 2011

Happy Valentine's Day!

I realize that the last post on this blog is from November. I've been thinking about blogging since the last post, but what with the whirlwind of the holidays and then devouring most meals before I have time to photograph them, it's been a bit of a difficult task to complete. I did quite a bit of baking and cooking over the holidays, made special cookies for the Superbowl (with Green Bay in the game this year it was practically a holiday around here), and various meals in between. I received "Mastering the Art of French Cooking" as a Christmas present this year, so I've been cooking quite a bit out of that too (mmm butter!). I made a pact with myself that I wouldn't post any of those recipes on this blog, although it is quite tempting.

The time has definitely come to post again. For Valentine's Day this year, the fiance and I are having a lovely dinner at home and enjoying each other's company. I've been thinking a lot about our Valentine's celebration last year, when we lived 450 miles apart, and I think I prefer this year's celebration infinitely better. He had a gig the night before and I had to teach on the Monday following, so we ended up meeting in the middle and walking around a mall. We had a nice dinner at a certain Australian restaurant, but having to drive to our respective cities alone afterwards was quite a let-down.

My Valentine's present to the fiance is a meal of his favorites, so that means lasagna, and also Red Velvet Cupcakes for dessert. I'll eat ANYTHING that has cream cheese frosting, so the Red Velvet Cupcakes were a double positive. I do have a wedding dress to start thinking about fitting into, so I used a recipe from Cooking Light to help make these a little less guilt-inducing. The end result is moist, delicious, and gorgeously red, oh and did I mention, CREAM CHEESE FROSTING?! That alone is make-your-knees-weak delicious. All in all, this recipe is getting filed away for many, many future uses. So enough with the backstory and on to the recipe!


Red Velvet Cupcakes
Ingredients:
2 1/2 cups cake flour
3 tablespoons unsweetened cocoa
1 teaspoon baking soda
1 teaspoon baking powder
1 teaspoon kosher salt
1 1/2 cup sugar
6 tablespoons unsalted butter, softened
2 large eggs
1 1/4 cup buttermilk
1 1/2 teaspoon white vinegar
1 1/2 teaspoon vanilla extract
2 tablespoons red food coloring

1. Preheat oven to 350° F.
2. Place 24 cup liners in muffin pan, coat with cooking spray.
3. Combine cake flour, cocoa, baking soda, baking powder, and salt in a medium bowl. Stir with a whisk.
4. Place sugar and butter in a large bowl, beat until blended (about 3 minutes). Add eggs, one at a time, beating well after each addition.
5. Add flour and buttermilk alternately to the sugar mixture, beginning and ending with flour. 
6. Add vinegar, vanilla, and food coloring; beat well.
7. Spoon into prepared muffin cups. Bake for 20 minutes, until toothpick inserted in center comes out clean.
8. Cool in pan for 10 minutes on wire rack; remove from pan. Cool completely before frosting. 

Cream Cheese Frosting
Ingredients:
5 tablespoons unsalted butter, softened
4 teaspoons buttermilk
1 8 oz block cream cheese, softened
3 1/2 cups powdered sugar
1 1/4 teaspoon vanilla

1. Beat butter, buttermilk, and cream cheese with mixer on high until fluffy.
2. Gradually add powdered sugar; beat until smooth.
3. Add vanilla; beat well.

Friday, November 5, 2010

Best Brownies

After the seriously decadent Viennese cake I made last month, I still had a bag of dutch process cocoa in the cupboard. It was only in there so long because I was a little hesitant to use it in a recipe that wasn't going to live up to the amazingness of DUTCH PROCESS cocoa. Seriously, that stuff is almost sinful. The craving for brownies hit last weekend so I searched for a recipe that would do the cocoa justice. I found that a lot of people look down on baking with cocoa. What?! Perhaps I just don't know, perhaps people are basing this opinion on lower grade cocoa, but whatever. I'll admit I wouldn't use it for all purposes, but seriously, brownies? 

I finally found one from Alton Brown that I felt would do the trick. The brownies that resulted are, I must admit, among the best I've ever had. Now, these are a little bit gooey, so if you like your brownies to have a more cake-like consistency, these are not for you. I'm personally a big fan of fudgy brownies, so they were right up my alley. Now, a word on the cocoa (another?! I know.... I'm sort of obsessed), it made these brownies extremely dark and rich. Rich enough that a glass of milk is not simply advised, it is absolutely mandatory. The only improvement I can think of for these brownies is the addition of walnuts. They were spectacular without, so maybe it should just be called a variation rather than an improvement.

As a funny addition: the recipe on the food network site has a bit of a typo that makes it look as though the recipe calls for 11/4 cup of cocoa. Now, most people would look at that and realize that it means a full cup plus a quarter, but some of the reviewers made the brownies with 11 quarter cups of cocoa. And got on the website to complain. Obviously, the recipe didn't work so well in those cases. Gotta love those concrete thinkers! 

Brownies (made with cocoa)

Soft butter, for greasing the pan
Flour, for dusting the buttered pan
4 large eggs
1 cup sugar, sifted
1 cup brown sugar, sifted
8 ounces melted butter
1 1/4 cups cocoa, sifted
2 teaspoons vanilla extract
1/2 cup flour, sifted
1/2 teaspoon salt


1. Preheat the oven to 300 degrees F. Butter and flour an 8-inch square pan.
2. With a mixer, beat the eggs at medium speed until fluffy and light yellow. Add both sugars. Add remaining ingredients, and mix to combine.
3. Pour the batter into a greased and floured 8-inch square pan and bake for 45 minutes (I used a 9x13 rectangular pan just because we don't have a square one, thinner brownies, but still yummmy!). Check for doneness with the tried-and-true toothpick method: a toothpick inserted into the center of the pan should come out clean. When it's done, remove to a rack to cool. Resist the temptation to cut into it until it's mostly cool (the toughest part of the recipe!)


Tuesday, November 2, 2010

Potato Soup & Bread bowls

I'll admit, this recipe is basically word for word from Southern Living via MyRecipes.com , but it presented some challenges that I had to remedy on my own. First of all- I was certain that a KitchenAid was going to be on my wedding registry, but I'm doubly sure of it now. I can remember making breads with my grandmother (who had a KitchenAid herself) and doing tons of kneading, which was a fun "old-fashioned" experience for me. But I found my little hand mixer just wouldn't get all 7 cups of flour into the dough and ended up doing a lot of it by hand. Also, the bread bowls seemed really small. I may just be used to Panera's gigantic sourdough bread bowls, but it didn't seem like you could get a whole serving of soup in there.

Luckily the soup was pretty low maintenance. Just throw a bunch of stuff in the crockpot, set the timer and forget about it. I think the recipe is a good basic potato soup but I think it could be much better if you played around with different ingredients and maybe some additional spices. Overall, a good recipe for a fall day.

Italian Bread Bowls
2 1/2 cups warm water
2 (1/4 oz) envelopes active dry yeast
2 teaspoons salt
2 tablespoons vegetable oil
7 cups all- purpose flour
1 tablespoon cornmeal
1 egg white
1 tablespoon water

1. Stir together 2 1/2 cups water and yeast in a large bowl. Let stand 5 minutes. Stir in salt and oil.

2. Add flour gradually, beating at medium speed with an electric mixer until soft dough forms.

3. Turn dough out onto a floured surface; knead until smooth and elastic (4-6 minutes). Place in a lightly greased bowl, turning to grease top. Cover and let rise in a warm place, free from drafts, 35 minutes or until doubled in bulk.

4. Punch dough down and divide into 8 equal portions. Shape each portion into a 4 inch round loaf. Place loaves on lightly greased baking sheets sprinkled with cornmeal.

5. Cover and let rise in a warm place, free from drafts, 35 minutes or until doubled in bulk.

6. Stir together egg white and 1 tablespoon water, brush over loaves.

7. Bake at 400 degrees for 15 minutes. Brush with remaining egg mixture, and bake 10-15 minutes more or until golden. Cool on wire racks. Freeze up to 1 month if desired.

8. Cut a 1/2 inch thick slice from top of each loaf; scoop out centers, leaving 3/4 inch thick shells. Reserve centers for other uses. Fill bread bowls with hot soup and serve immediately.

Potato Soup
6 potatoes, peeled and cut into 1/2 inch cubes
2 medium onions, diced
2 carrots thinly sliced
2 celery ribs thinly sliced
2 (14 1/2 oz) cans reduced sodium chicken broth
1 teaspoon basil
1 teaspoon salt
1/2 teaspoon pepper
1/4 cup flour
1 1/2 cup half and half

1. Combine first 8 ingredients in 4 1/2 quart slow cooker.

2. Cook, covered at HIGH for 3 hours or until vegetables are tender.

3. Stir together flour and half and half; stir into soup. Cover and cook 30 minutes or until thoroughly heated. Serve in bread bowls.

Wednesday, October 20, 2010

Apple Chips

Okay, one more apple recipe. Last one, I promise!! (I can say that for sure because I used the last of the orchard apples in this recipe)

I was at work at 6am this morning. Yes, you read that right, 6 am. Which means that my alarm was set for 4:50 (since I also had to look as though I could be selling expensive clothes at 6am while changing around the whole store set- new holiday clothes though, YAY), and I spent the whole night terrified I wouldn't wake up on time to go to work, so I woke up every few minutes. Anyway, I'm exhausted. So my rule for the day was: stay out of the kitchen unless it doesn't involve sharp knives (oops, broke that rule), or won't take longer than 5 minutes to prep.

We had these last few apples lying around still and I was trying to figure out how to put them to good use before they got all shriveled and no good for anything but compost. On the way to work yesterday I had a sudden yearning for these apple chips I used to snack on in college. I figured it would be easy enough to slice up some apples, dust them with cinnamon and sugar, and bake until they're chips! Even though my tiredness level is pretty high, I managed to wield the knife without any mishaps. Eating apple chips while sitting on the couch with a good book and a cup of tea on a fall day is my idea of relaxing!

Apple Chips
2 tablespoons sugar
1/8 teaspoon cinnamon
4 apples sliced crosswise into 1/8 inch thick rounds

1. Preheat oven to 225 degrees. Mix sugar and cinnamon in a bowl. Arrange apple slices on 2 baking sheets lined with parchment paper; sprinkle with cinnamon sugar. Bake for 1 hour; peel apples parchment and return to paper. Continue baking until apples are golden and crisp (about 30 minutes more).

These will store in an airtight container for up to 5 days (if they last that long that is!) My biggest tip for these is make sure you slice 'em thin. Too thick and they'll bake, but be chewy instead of crispy.

Saturday, October 16, 2010

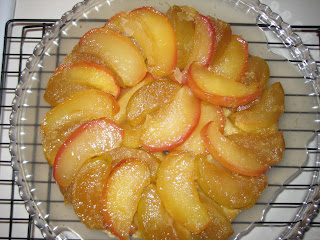
Tarte Tatin

I'm absolutely loving the apple harvest this fall! We went to an orchard last weekend, and then while my dad was visiting he and I went to another. I made an apple crisp to go with our mushroom stuffed beef roast dinner, and an apple pie for this weekend when we are going on a hike in a state park. I decided that it was far too cruel (to myself as well as to the fiance) to bake a pie and have to wait to break into it, so the idea came up for a tarte tatin.

I've been lusting after this tart for quite a while, the page in my french cookbook has been marked for at least a year, if not longer. Anything carmelized is sure to be delicious, and french pastries are unmatched in my book. This is not for those worried about calories, fat, or cholesterol, but you only live once afterall!

Tarte Tatin
1 1/2 pounds (5-6) apples (preferably pippins, Granny Smiths or Jonathans)
1/4 cup unsalted butter, plus butter for greasing pan
1 1/2 cups sugar
2 tablespoons lemon juice
Zest of 1 lemon removed with lemon zester or grater
1/2 cup water
whipped cream, sweetened lightly (optional)

Pate Brisee
1 1/4 cups flour
1 1/2 tablespoons sugar
Pinch salt
Grated zest of 1/2 lemon
1/2 cup chilled unsalted butter, cut in 8 pieces
1 large egg yolk
2 tablespoons water

1. Preheat oven to 425 degrees. Core apples and cut each into 6 slices.

2. In a large skillet over moderate heat, melt butter. Add 1/2 cup of the sugar, lemon juice and lemon zest. Add apple slices and stir to coat with butter. Cook, uncovered, for 5 minutes. Remove from heat.

3. In a small, heavy saucepan, combine remaining sugar and the water. Cook over medium heat without stirring, until sugar turns golden brown. Immediately pour caramel into a greased 9 inch cake pan. Swirl cake pan quickly to coat bottom with caramel.

4. Arrange apple slices in neat concentric circles on top of caramel. Any remaining apple slices can be piled randomly on top. Reduce liquid remaining in skillet to 1/4 cup and spoon over apples. On a lightly floured surface, roll Pate Brisee into a circle large enough to cover pie plate and about 1/8 inch thick. Cover apples with pastry. Bake until crust is golden brown (about 25 minutes). Cool pie on a rack 15 minutes. Unmold onto a serving dish. Serve in wedges with cream (if desired).

Pate Brisee
1. To make in food processor: Combine flour, sugar, salt and lemon zest in work bowl. Process 2 seconds. Add butter and process until mixture resembles coarse cornmeal. In a separate bowl combine egg yolk and the water. With motor running, add egg mixture through feed tube and process until dough almost forms a ball. Remove from work bowl and gather into a ball with lightly floured hands.
To make by hand: Stir together flour, sugar, salt and lemon zest. Cut in butter until mixture resembles coarse crumbs. Combine egg yolk and the water. Add to mixture, tossing gently with a fork to blend. With lightly floured hands, knead mixture just until it forms a ball.

2. Pat dough into a 5 inch disk. Cover with plastic wrap and refrigerate up to 3 days or freeze for up to 1 month. Remove from refrigerator 10 minutes before rolling.

Thursday, October 14, 2010

Viennese Cake

You KNOW if these are the ingredients, it's going to be a good one! 
We've been going to various cake tastings lately, trying to choose our bakery for the wedding. At our second tasting, we had this cake that I knew my fiance wouldn't like, but I LOVED.  The description alone left me in a haze of chocolate overdose amazingness- "Four layers of dark chocolate cake with red raspberry preserves, belgian dark chocolate ganache, delicate chocolate mousse, chocolate buttercream and finally enrobed in belgian dark chocolate ganache".  The actual cake was even better than you can imagine, I actually couldn't finish the thin slice on my plate at the tasting (keep in mind, we were also trying a cake with two chocolate cake layers with a layer of raspberry preserves and CHEESECAKE between). 


Ever since then I've been looking for a similar recipe to try to recreate it at home. This is my tweaked version of a Viennese chocolate cake recipe (for a 6 inch cake pan because, two people do not need a whole cake to tempt them all week). We had this as a dessert after the manicotti. It was a perfect ending to the meal, although we were all stuffed and this cake is quite decadent, so small slices were plenty. We had enough left over for a few more days of enjoyment.


Cake
1/3 cup plus 1 tablespoon cake flour
3 tablespoons Dutch-processed cocoa powder
3 large eggs, separated plus 1 large white, at room temperature
1/2 cup granulated sugar
3 tablespoons unsalted butter


1. Preheat the oven to 350 degrees. Grease and flour a 6 inch cake pan. 


2. Sift the flour and cocoa into a bowl. Whisk the egg yolks with 1/3 cup of the sugar until they are light and frothy. Using an electric mixer, beat the egg whites until they form stiff peaks, adding the rest of the sugar halfway through the process. 


3. Melt the butter and cool slightly. Gently fold in a third of the egg whites to the beaten egg mixture with a rubber spatula. Then add the melted butter and the flour mixture. Finally, fold in the rest of the egg whites. 


4. Pour the mixture into the pan and bake for about 30 minutes, until the cake springs back when pressed. Remove from the pan and cool on a wire rack. 


5. When cool, slice the cake horizontally into 3 layers of equal thickness.


Chocolate Ganache
7 ounces bittersweet chocolate, chopped
2/3 cup heavy cream
4 tablespoons unsalted butter, diced and softened


1. Melt the chocolate in a microwave or in a bowl set over a pan of barely simmering water (the bowl must not touch the water). 


2. Bring the cream to a boil, and pour the cream onto the melted chocolate. Whisk until smooth, then add the butter, one piece at a time, whisking well until smooth.


3. Refrigerate until the ganache is as thick as pudding.


To assemble the cake:
- Spread each of the three cake layers with a thin layer of warmed raspberry jam. Spread a third of the chocolate ganache over the jam on each layer, up to the edges, but not over. 
- Stack the layers into a single cake. Cut a strip of parchment paper to the depth of the cake by the circumference of the cake, plus an inch or two. Wrap the strip around the cake, fastening the overlap with a piece of tape to hold the layers firmly in place while chilling. 
- Chill in the refrigerator at least 5 hours. 


Chocolate Icing
4 ounces bittersweet chocolate, chopped
1/4 cup water
2 teaspoons glycerine
3/4 cup sifted confectioners' sugar, as needed


1. Melt the chocolate with the water, beat in the glycerine and sufficient sugar to achieve a coating consistency. 


2. Cool until pourable, but not too runny, or it will not adhere well to the sides of the cake.


3. Remove the paper strip on the cake. Place on serving plate. Smooth the icing over the top and sides of the cake with a metal spatula, and return to the refrigerator to set. Before serving, allow to come to room temperature for best flavor. 

Saturday, July 31, 2010

Pound Cake

I woke up this morning feeling a little sad that I didn't have a reason to bake this weekend. After the marathon of pie-cake-and banana bread baking day I took a week or so off, but then made a cheesecake for my dad's birthday. Who doesn't love cheesecake? But I haven't been able to think of another reason to bake- until inspiration hit while making the grocery list this week. 

While looking at the ad for this week's sales at the grocery store, I saw that strawberries were on sale. So, the baking muse whispered in my ear and said "pound cake, fresh strawberries, and whipped cream". Of course, I had to oblige. 

Last summer, when the relationship with the fiancé was fairly new,  we were supposed to go to his parents' for dinner (and a first meeting). I thought I'd make a great first impression and bake something to take along for dessert. Well, the only issue here was that the knobs on the stove in the fiancé's apartment had all the numbers and wording rubbed off.... so I was guessing on where "bake" was and the temperature too. After twice the amount of time called for in the recipe, I came to the realization that only the top burner had been going the whole time, hence my burned on top and still batter on the bottom pound cakes... well, let's just say I wouldn't advise broiling your pound cake. We've since had the knobs replaced and baking has been much easier since. 

So, about a year later, I got up the guts to try the pound cake recipe again, this time with the stove securely set to "bake".  

Pound Cake
1/2 lb butter
1/2 cup shortening
3 cups sugar
5 eggs
3 cups flour
1/2 teaspoon salt
1/2 teaspoon baking powder
1 cup milk
1 teaspoon vanilla

1. Preheat oven to 350. Cream butter and shortening together. Add sugar, a little at a time. Add eggs, one at a time, beating after each addition.

2. Stir dry ingredients together, add to mix alternately with milk. Begin adding with flour, end with flour. 

3. Mix in vanilla. Pour batter into 2 greased and floured 9 inch bread pans. Bake 1- 1.5 hours, until toothpick comes out clean. Cool in pan for 10 minutes, then take out and let cool completely.


Sunday, July 18, 2010

Birthday... Pie?

As I mentioned before the fiancé prefers pie to cake. So, for our joint birthday celebration last weekend, I made a birthday cake for myself, and a birthday pie for him. I gave him free reign over what kind of birthday pie he wanted, and after looking through a ton of recipes, he decided to try a variation on a pecan pie. I'd never made a pecan pie before, always played it safe with fruit pies, so this was a fun little adventure for me too.

I was a little nervous, though, since this was going to be served at a birthday party with his family, and you never want to bring a poorly made pie to a party, much less a party with your future family-in-law. Everything worked out fairly well even though it was ridiculously hot in the kitchen, again, and I did quite a lot of raging after the pie crust refused to transfer easily from the table to the pie dish. I managed to get everything to work eventually, though, and it was DEFINITELY worth the headache.

English Toffee Pecan Pie

Crust:
1 1/4 cup all-purpose flour, plus more for work surface
1/2 tsp salt
1/2 cup shortening
2 tablespoons cold butter, cut into pieces
3-4 tablespoons ice water

1. In a large bowl, whisk together flour and salt. Using a pastry cutter, cut in shortening and butter until mixture resembles coarse crumbs, about the size of peas. Sprinkle with water, 1 tablespoon at a time, and mix lightly with a fork after each addition, until mixture is moistened. Turn out dough onto a clean work surface and shape into a flattened disk. Wrap in plastic; transfer to refrigerator and chill for 30 minutes.

2. Lightly flour a pastry cloth (which I didn't have, but if I'm making lots of pies in the future, I definitely will be looking into getting some!) and roll out dough on cloth, using a covered rolling pin, to a 12 inch round, about 1/8 inch thick. With a dry pastry brush, sweep off excess flour, fit dough into a 9 inch glass pie plate. Trim to a 1/2 inch overhang all around. Fold under and trim edges.

Filling:
3 large eggs, lightly beaten
2/3 cup light corn syrup
1/4 cup unsalted butter, melted
1/4 teaspoon salt
1 teaspoon vanilla extract
1/2 teaspoon almond extract (make sure it's ONLY 1/2 teaspoon, or even slightly less, this stuff can easily overpower the other flavors)
1 cup toffee bits (you can buy Heath brand already chopped up in the baking aisle)
1 cup chopped pecans
22+ pecan halves, for garnish

1. Preheat oven to 375 (rack in lower third of oven). In a large bowl, mix together eggs, corn syrup, brown sugar, butter, salt, vanilla, almond extract, toffee bits and chopped pecans.

2. Pour filling into pie crust. Top with pecans by evenly spacing 14 around outer edge of pie filling. Make a second row by evenly spacing 7 pecans in a smaller circle in the center. Place 1 pecan in center. (I ended up using more pecans in my two outer circles, I just placed them closer together)

3. Transfer pie to oven; bake for 20 minutes. Cover with parchment paper-lined aluminum foil and continue baking until a knife inserted in the center comes out clean, 20-30 minutes more. Transfer to a wire rack to cool.


Unfortunately, I only have one photo of the pie, since after we cut it I didn't have a chance to take more. Also pictured is my chocolate cake and a loaf of banana bread I just happened to make the same day. It was a very busy, but very very fun day in the kitchen, even with the heat.